FF Construction Kit -- Tutorial
This guide will walk you through creating your first simple gamebook.
- A quick tour of the user interface
- Creating your first page
- Adding exits
- Linking to other pages
- Adding monsters
- Finishing the story
- Previewing the book
- Adding illustrations
- Setting your book properties
- Exporting your book
- Conclusion
A quick tour of the user interface
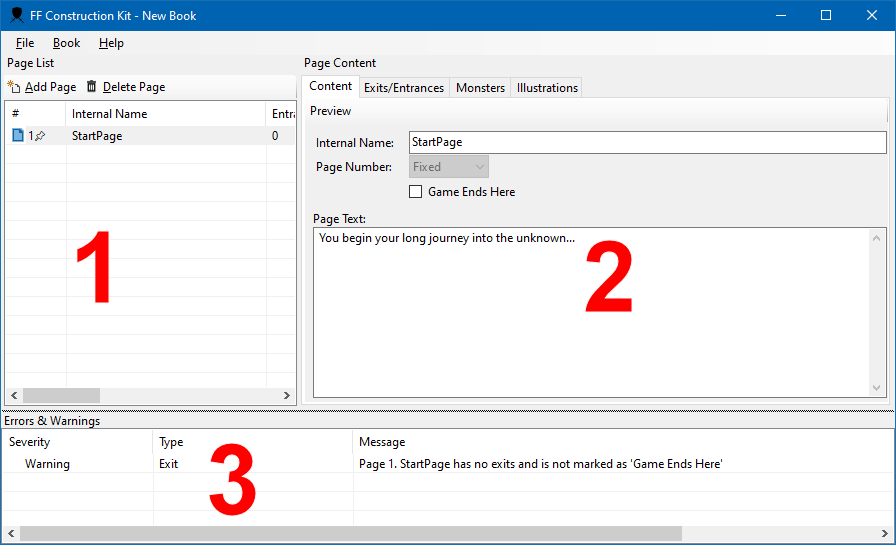
The FF Construction Kit main window is divided into three panels:
Note that each of these panels is resizable by dragging the bar between them.
Page List panel
The top-left panel shows the "pages" in the book (these may be known as "sections" or "paragraphs" in other systems). Each page contains a self-contained piece of text with its own page number, has exits that can be followed to other pages (e.g., "To open the door, turn to 99") and may also have monsters and illustrations.
The page list contains the following columns:
- Page index/status. The first column shows the page "index". The index is used purely to sort the pages into order while designing the book. These are not the actual page numbers that will appear when the book is generated (the page numbers will be generated randomly automatically). This column will also display a "pin" icon if the generated page number is fixed (as is always the case with the very first page), and will show a "skull" symbol if the page marks an end to the book.
- Internal name. This is a unique name that you will use to reference the page within the book. When creating exits, the internal name is used to link the pages together. Try to provide short and meaningful names to make it simple to identify the pages just from their internal names. The player will never see these names.
- Entrances. Shows how many other pages link into this page.
- Exits. Shows how many exits are contained within this page. If an asterisk ("*") is displayed next to the exits, one or more exit has been defined that doesn't yet link to another page
- Text. Shows the beginning of the page text.
To view or edit a page, just click its entry in the list.
Page Content panel
The top-right panel shows contain within the selected page. This panel is divided into four tabs:
- Content. This allows you to set the internal name, choose whether to use an automatic or fixed page number (leave this at automatic unless you really need a specific fixed number), lets you indicate whether the game ends on this page, and provides an area for editing the actual page text.
- Exits/Entrances. We'll explore how to manage exits later in this tutorial.
- Monsters. We'll explore how to manage monsters later in this tutorial.
- Illustrations. We'll explore how to manage illustrations later in this tutorial.
Errors and warnings panel
Finally the bottom panel contains errors and warnings found within your book. This is updated in real-time as you edit the book, so you can always see any items that need your attention. Generally the presence of errors or warnings will not prevent you viewing or exporting your book, and it's normal for this list to have issues in it throughout the time you're writing your book. When you're completely finished and ready to publish, you should ensure that all the problems shown here are resolved.
You can double-click any displayed error or warning to jump straight to the page that it refers to.
Creating your first page
Now we've had a look around, let's start creating our book.
The first page, which will always appear as page 1, is created automatically and cannot be deleted. We can start off by simply entering the text we want to appear in the Page Text box.
The text can be formatted using Markdown. If you're not familiar with it, you can visit the Markdown Guide site for more information. In simple terms, it provides support for quick and easy formatting that will allow to create headings, apply bold or italic text, bullet lists, and much more. If you don't need these features you can pretty much ignore Markdown and just enter plain text.
At any point if you want to see how your page looks, click the Preview button at the top of the tab. A window will appear showing you the complete page text with formatting applied.
Let's start by creating a very simple story. Enter the following text into the Page Text box:
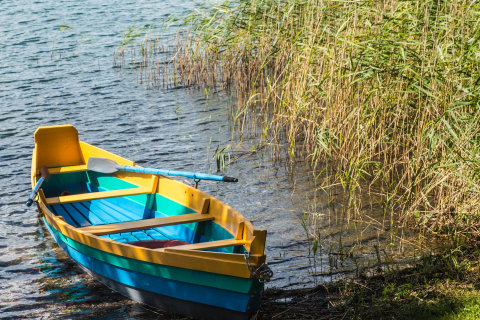
You are standing by a river. A large treasure chest is on the other side. It looks like there are two ways to cross the river: via a rope bridge or using a small boat that is tied to the bank in front of you. How would you like to proceed?
That's all we need to add for now. Note that we haven't provided any links to other pages, these are added automatically once we create our page exits. We'll look at those next.
To check how the page looks so far, click Preview. There's not much to see yet, just a page heading and the text we have entered. We'll see the content here expand as we add more to our pages though.
Before we move on, let's save the book. As always, it's a good idea to save regularly as you work to avoid losing any data. You can save using the usual methods, via the File menu or by pressing Ctrl+S. I'd recommend creating a new folder for your book to keep everything self-contained.
Adding exits
So that FF Construction Kit understands the structure of your book and how everything links together, we must explicitly define the exits between pages, rather than just typing them into the page text. This allows the system to ensure that the correct page numbers are entered, and makes it possible for it to check missing exits and other issues.
You can add the exits at any point in time, but I'd strongly recommend you add all the exits for each page straight away, even before the pages they will link to have been created. FF Construction Kit can keep track of exits that don't have any linked pages, and makes it easy for you to come back to these later without missing any.
For our first page, we know we need to have two exits: one for the rope bridge and one for the boat. Let's add these both now. Select the Exits tab, and then click the "Add Exit" button twice -- once for each exit. Two exits will appear in the list. At the moment they have no exit text, and the exit page shows as "Not set". You'll also see that the Errors and Warnings panel shows that our page has two exits with no text and with no destination. We'll use this to help keep track of things we need to come back to as we work through the book.
Let's add some text for each exit. Select the first exit in the list, and in the "Exit text" box below the list, enter the following:
If you would like to cross using the bridge
In the second exit, enter this:
If you would prefer to try the boat
Having done this, return to the Content tab and click the Preview button. You'll see that the choices are now appearing automatically after your page text. We haven't yet linked the exits to other pages, so the choices end with "turn to (NOT SET)", but we'll correct this in a moment. Note that you don't need to provide the words "turn to" in your descriptions, these are added automatically.
Linking to other pages
Now that we have some exits set, let's link one up to another page. When you're linking to a brand new page, the quickest way to do this is to return to the list of exits and double-click the one that we want to link. In this case, double-click the exit for the boat. FF Construction Kit will tell you that the exit doesn't currently link to a valid page and asks if you'd like to link it to a new one. Click Yes.
You'll see now that a new page has appeared in the list, with a default internal name of "_PageName_2". You'll also see in the page list that the Entrances value for the new page is 1 (one other page links here), and that the Exits value for the start page now reads "1/2*" (this shows that one of two exits is fully set up, the asterisk indicates that at least one is not set).
In our new page, let's first set its internal name. We'll change this to "EnteringBoat". After you've set this, if you check back to the exits for the start page, you'll see that this internal name now appears as the book's exit page. It's important to give concise, meaningful names, as these will make it much easier to see how your pages fit together.
Let's set some text for the new page. Enter the following:
You carefully climb into the boat, steadying yourself to avoid falling into the water. Once you're feeling balanced, you pick up the oars and begin to row across the current of water.
As before we now need to add our exits. In this case we'll have just a single exit, moving the player forward without actually asking them to make a choice this time. In the Exits tab, add a single exit. Normally FF Construction Kit needs you to enter some text for each exit, to tell the user what they're choosing. However when a page only has one exit, the text can be left blank. Double-click the exit so that you are prompted to add a new page, and once again click Yes so that a third page is created.
In the steps above we added links to brand new pages. In many cases you may want to link an exit to a page that already exists. To do this, simply select the exit to update and then choose the target exit page in the "Exit page" dropdown list. If you ever need to change which page an exit links to, amend it in the same way.
Before we move on to the next section, a couple of tips about navigating between pages.
You can of course select any page you like from the list on the left, but it's also possible to move between pages in the same way that the player does. For any exit that already has a linked page, double-clicking the exit will take you straight to the page that the exit links to. You can see this by double-clicking the linked exits on either the StartPage or EnteringBoat page.
The Exits tab also shows a list of "Entrances" -- other pages that link to this one. Double-clicking any of the entrance pages will take you back a step to that page, so you can easily see how the player can arrive at any particular location.
Monsters
While not essential, many books will want to present monsters and battles for the player to overcome. FF Construction Kit currently models these on the Fighting Fantasy system, with "skill" and "stamina" values assigned to each monster. Let's add a river snake that the player must fight as they cross the river.
In the new page that we just created, first set the internal name to "RiverSnake". Now add the following text:
The boat makes good progress across the river. Just as you start to feel confident that you'll reach the other side safely, the boat tips to one side and a huge **River Snake** emerges from below the surface. You must fight the snake before you can continue.
Now we've set the scene, let's define the monster itself. Click on the Monsters tab and then click Add Monster. We need to provide each monster with a name, and a value for its Skill and Stamina. Fill these in however you think is appropriate -- this is only the player's first battle so don't make it too tricky!
Once you've set the monster details, return to the Content tab and click Preview. You'll see that the monster details have been added to the text automatically.
Assuming the player survives, we'll allow them to make it across to the far side of the river. Add a single exit, set its text to "If you survive the battle", and double-click it to create another new page.
Finishing the story
We've nearly finished this branch of the story. In the new page, set its internal name to "Treasure" and set the following page text:
You cautiously climb on to the river bank, the treasure chest never leaving your sight. As you get closer you see it is overflowing with gold and gems. You will truly be happy for the rest of your days.
**THE END**
This is the end of the story, but in the Errors and Warnings panel you'll see that you are being warned that this page has no exits. To tell FF Construction Kit that this is an ending page, check the "Game Ends Here" box on the page Content tab, and the warning will disappear. You can use this for any type of ending, successful or otherwise, to tell the system that no exits are expected. A skull symbol will appear in the page list to identify these game ending pages.
So that wraps that up, but what if the player chose to take the rope bridge back at the start? We can see we haven't finished, as the Errors and Warnings panel informs us that "StartPage has 1 exit with no destination set". We'd better go back and fix that. Double-click the warning to return to the list of Exits on the start page.
Now you can see that the missing exit is for when the player chooses the bridge. Double-click the exit and create a new page. Set its internal name to "RopeBridge", and set the following page text:
The bridge sways alarmingly as you cross it, and as you near the middle it gets harder and harder to keep your balance. With some great relief you finally make it across to the other side.
To finish joining the pages up, add a single exit. This time we don't want to link to a new page, but rather to an existing one, where the player finds the treasure. In the "Exit page" box below the page list, pick the "Treasure" page to link to that existing page. Note that there's no need to add any Exit text in this case because we only have a single exit.
Now that all our exits are set and everything links up properly, you should find that the Errors & Warnings panel is completely empty. Congratulations, you have completed your first book!
Previewing the book
So that's all great, but what's it like to play? There are various options to export your book to a file on disk (which we'll cover shortly) but you'll regularly want to try the book out as you go along, and you can easily do so using the "Preview Book" item in the "Book" menu. This will randomise all the pages and show you a complete working preview of whatever you've created.
You don't need a finished, error-free book in order to view the preview. You can preview at any time you like, even if there are still problems to fix. It's a good idea to preview the book on a regular basis as you build the story, to make sure things are working as expected.
When viewing the preview, you can click the page numbers in the "turn to" sections to jump to the referenced page.
Adding illustrations
A picture paints a thousand words, and often it's great to be able to add illustrations alongside your text. These can be easily added via the Illustrations tab.
Select the first page (StartPage), and then click the "Add Illustration" button. Below the illustration list, enter a name of "River", and then click Browse to find an image. You can use this image file to illustrate your page -- or provide your own image instead if you wish. Once you've selected your image, a preview will appear in the bottom section of the panel.
It's recommended that you create a folder alongside your saved book, and place all your illustrations here. This makes it easy to keep track of everything. You can reference them from anywhere you like however if you choose to.
When adding images, please be very careful not to violate anyone's copyright. If you use a "creative commons" image, you should enter a suitable attribution into the Attribution box to identify where the image has come from.
Once you've added your illustration, return to the Content tab and preview the page to see your illustration in place alongside the rest of the page content.
Setting your book properties
We're nearly finished with the tutorial book now, but there are just a few more things to set before we publish it. We can set the book properties via the Book / Properties... menu item, which opens the Properties window:
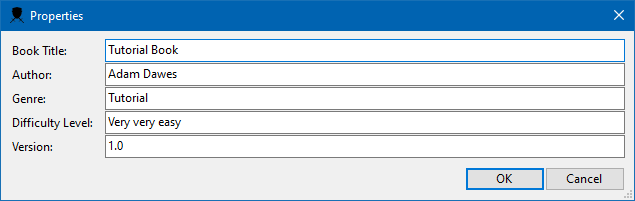
Update each of the fields as follows:
- Book Title should be the name of your book, as would be shown on the front cover.
- Author is your name.
- Genre is whatever genre your book falls into (fantasy, science fiction, or whatever you think appropriate).
- Difficulty level can be left blank, or you can use this to briefly describe how difficult your book will be to play.
- Version allows you to assign a version number to the book. If you make revisions, you can change this so that players know which version they are reading.
Once you've completed these details, click OK.
Exporting your book
The very last thing to do now everything is ready is to export your book. This will create a finished document, ready for others to read and play. To begin the export, select File / Export... from the menu.
You can choose to export into several formats:
- PDF will create a fully self-contained PDF version of your book, containing all formatting and images. This is the easiest format to use for distributing your book to other people.
- HTML will create an HTML version of the book, which is great for hosting online. You can choose various options for how images are managed: you can either continue to reference them in the folders you specify, or can copy them all to the same directory (or an "images/" subdirectory) of your export location. Finally, you can also choose to embed the images directly into the HTML. Embedding allows you to create a single file, but the file can be quite large. Generally it's best to choose one of the file copying options.
- Text will create a text-only version of the book. This results in a very small file, but it will not include any formatting or illustrations you have added.
Once you have set your options and chosen an export filename, click OK to complete the export. After a few seconds you'll be prompted as to whether you'd like to view the exported book straight away.
Conclusion
This is of course a very simple example of the kind of books you can produce with FF Construction Kit. The only limit is your imagination, so why not start writing your next interactive masterpiece right now?
As always if you have any suggestions or run into any problems, feel free to contact me and let me know.
And remember: YOU are the AUTHOR!